Showing posts with label Create a Critter. Show all posts

Friday, February 22, 2013

Happy Birthday...

Party Animal!
 
Today is Sketchy Friday day!
 
And I am so excited to share my card with you, using sketch #8 for my INSPIRATION!
 
 
When I first saw this sketch, I thought of leaves around the edges.  Why?  I don't know.
So my brain started working extra hard to figure out what I was going to create.
Then I remembered...Sonia had some really cute little zoo animals in her selection of digi images.
I thought the Elephant, Giraffe and Lion would be really fun to use!
 
Anyway, this is my take on our sketch this week. 
I hope it makes you SMILE!
 
 
Supplies I used to create my card:
I started with an A2 kraft card
Layers of designer papers from my stash of Close to My Heart papers (some really old papers)
The animals were outlined using E00 Copic maker
Using a 1-1/2" square punch, punch the animals out and layer on top of 1-3/4" yellow square
Leaves were created using Cricut "Create a Critter"cartridge page 51 <Leaf> cut ten at 1-1/4"
Add sponging around the leaves and black ink line work
 
Finishing Touches:
Blue grosgrain ribbon, sentiment (made by me) and google eyes
 
I really hope you will be able to join us for our sketch challenge.
Stop by to see the rest of Design Team B's creations and be inspired.
 
Remember...
Random draw winner will receive 1 digi image, but if you use a SKdigi, you will receive 2 images
Check out the FREEBIES or the SHOP
 
Thanks for stopping by today and checking out my card.
 
Card Makin' Mama's - It's Birthday Time
Allsorts - Challenge #195 - Animals
A Gem of a Challenge - #68 Add a Bow
 
Enjoy your weekend - Catch the Frenzy! - Karen


Monday, March 26, 2012

Sweet little Lamb

My share today is my Design Team creation for Fantabulous Cricut  - Challenge Me Monday #104 "Out like a Lamb".  The basic idea for this card had been developing in my head weeks.  I finally had time to create it last Saturday and I have been waiting to share with everyone.  It was so much fun to make and when I look at it, it makes me go all soft and squishy inside.  I hope it has the same affect on you.

I started with a 7" x 8" white cardstock, folded in half to create a 3-1/2" x 8" card.  I added 1-1/2" x 8" strip of Bubblegum gingham paper at the bottom of the card.  The next layer is a 3/4" strip and a 2" circle Citrus Leaf cardstock, with a 1-3/4" white circle.  Inside this circle I stamped a circle message that says "Cutie...Cutie" and used a second stamp inked in Bubblegum "Hello" for the center.

I used Create a Critter, pg. 71 <Lamb> cut at 4" for all layers.  The tulips are from the same cartridge, pg. 69 <Bttrfly2> using the accessory feature, cut at 3".  George and Basic shapes was used for the 2" Citrus Leaf circle.  The last cartridge I used was Walk in My Garden, pg. 115 <btfly1> cut at 1" using the blackout feature.  I cut a second one in Citrus Leaf and used the body only.

For my finishing touches I used Baby Pink ink to sponge around the white portion of the lamb, Bubblegum ink sponged around the gingham paper on the lamb, tulips, butterfly wings.  Citrus Leaf ink for the leaves, grass and butterfly body.  I added line doodles with my black  .01 micron pen to my cuts outs and the lamb got eyelashes and cheeks with little white dots for her eyes.  Adhesive pearls were added to the tulips, buttons for the lamb and the butterfly head.  And the last touch was the sweet little Limeade baker twine bows added to my little lambs ears.

Catch the Frenzy!

Monday, March 12, 2012

In like a Lion

My share today is my first as a Design Team member at Fantabulous Cricut for the Challenge Me Monday #102 - In like a Lion.  Please use the link above to check out creations by other DT members for some inspiration.
I found many lion images on several Cricut cartridges.  I decided to use the <Lion>, plus all layers and shadow feature found on page 57 of Create a Critter cartridge cut at 3". 

I also used the <Leaf> on page 51 of the Create a Critter cartridge cut at 2" and used 6 leaves on my card.  The tree is actually the <Branch1> found in the Winter Woodland cartridge, page 38 cut at 2-1/2".  The last cartridge I used was Simply Charmed for the <Sun2> found on page 50 with layer 1 cut at 1-1/2"

This card is a 6" X 6" card.  I used a light blue base, and sponged clouds onto the background with Heavenly blue ink.  I tore 3 strips of garden green paper and used an old Close to My Heart stamp called Scratches and garden green ink onto the torn strips.  I also sponged garden green around all 6 leaves.  The sun and lion have sunflower ink sponged around edges.  The lions mane was ran through my Cuttlebug using the tiny bubble folder.  I then used my Micron black pen to add outline details.  Layer all pieces as shown in the photo working back to front.  All paper, stamps, cloud stencil from Close to My Heart.

For other finishing details... I found some green buttons and added Bon Bon colored twine from Doddlebug design to 5 buttons, made a bow with the twine as well.  And last of all, I stamped my sentiment on white cardstock and mounted to brown cardstock.  I wanted to make it look like a sign hanging from the tree, so I punched tiny holes in the top corners, added same Bon Bon twine.  A brown brad went into the trunk of the tree to hang the sign on.

 I hope you enjoyed my card and thanks for stopping by today. 

Catch the Frenzy!


Sunday, February 5, 2012

Little Cuties

Today I have 3 posts share, so make sure you check them out. 


We have been invited to a Super Bowl party, so I wanted to make sure I got all my cards completed, my blogging done, and challenges linked before we left the house.  I am also teaching a card class with some wonderful friends Monday night.  All my samples and prep work also done. 

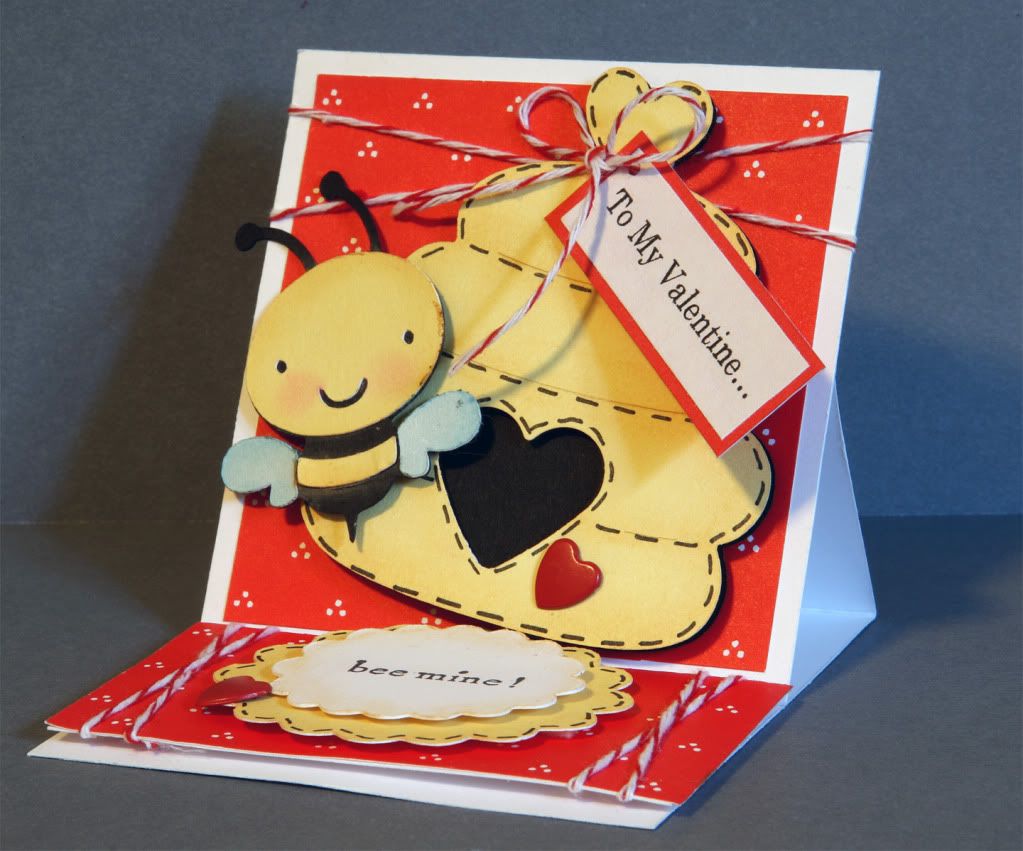
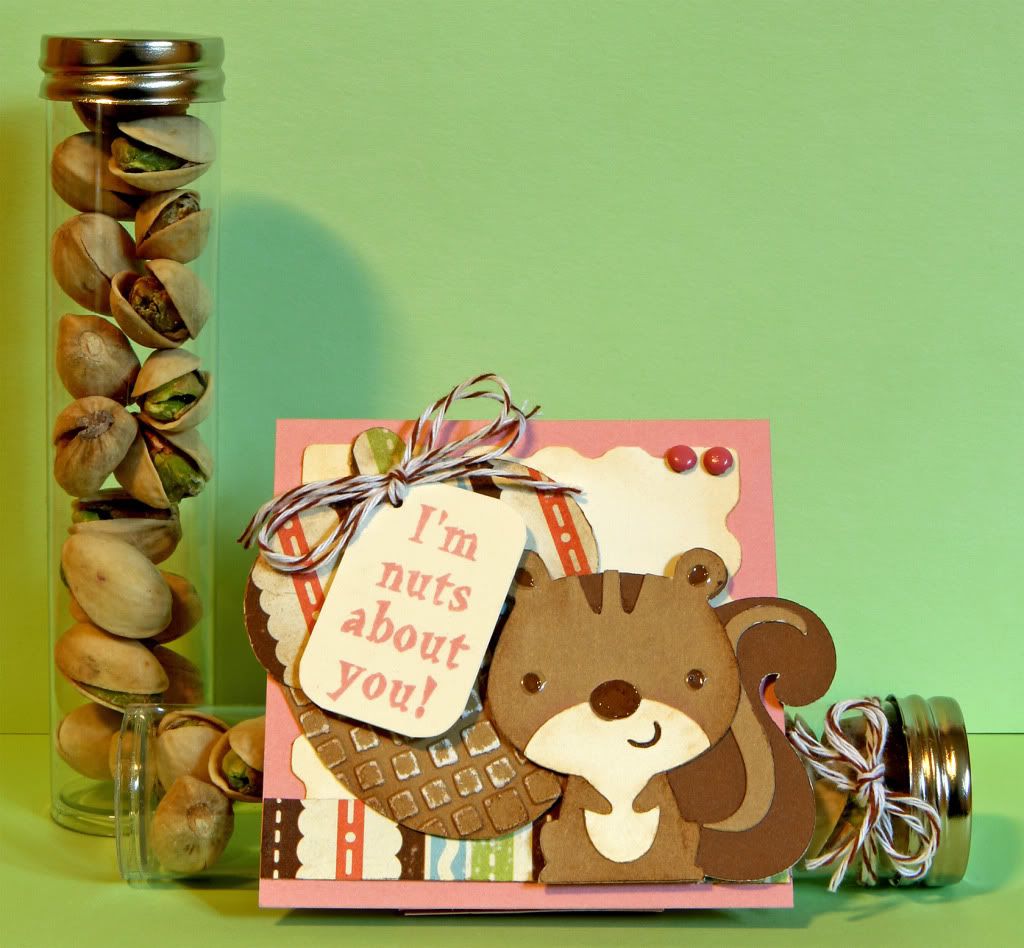
These 2 little cuties were created for Fantabulous Cricut Challenge blog - #96 Valentiny Cards 3 x 3 and for my card class Monday night.  I can only enter one in the challenge, but wanted to share both cards on my blog.

To make these cards:

For Bee Mine easel card...

White card stock for base of card.  You will need 1 piece cut 3" x 6" for base of card, another piece cut at 3" x 3" for front of card and the last piece is 1-1/2" x 3" for inside.  The red pattern paper is cut at 2-3/4" x 2-3/4" and another piece cut at 1-1/2" x 3"  


Cartridges used:

Create A Critter - page 68 <Bee> cut at 1-1/2" with layers and beehive using the Accessory feature cut at 2-1/2".  I used scrap cardstock to create the Cricut cuts in Yellow, White, Black and Blue

Elegant Edges - page 65 <Flower3> using the Oblong feature cut at 2" Yellow and 1-1/2" White


side view
 To complete this card:

I used a heart shape punch to create the opening int he beehive.  Created the To my Valentine message on the computer and stamped the bee mine! message on the white oblong shape.  Added red heart brads and red bakers twine as seen in the photo. Adhere all pieces working back to front as shown in the photo.


I'm Nuts about you!


Cut 3" x 3" Pink cardstock for base and another piece of pink cardstock 1-1/2" x 6" for back easel piece.

Cartridges used:

Create a Critter - page 32 <Squirrel> cut at 2" and all layers.  Acorn piece is cut at 2-1/2" using the Accessory feature.
Elegant Edges - page 37 <Stamp-s> cut at 2-1/2" in cream cardstock

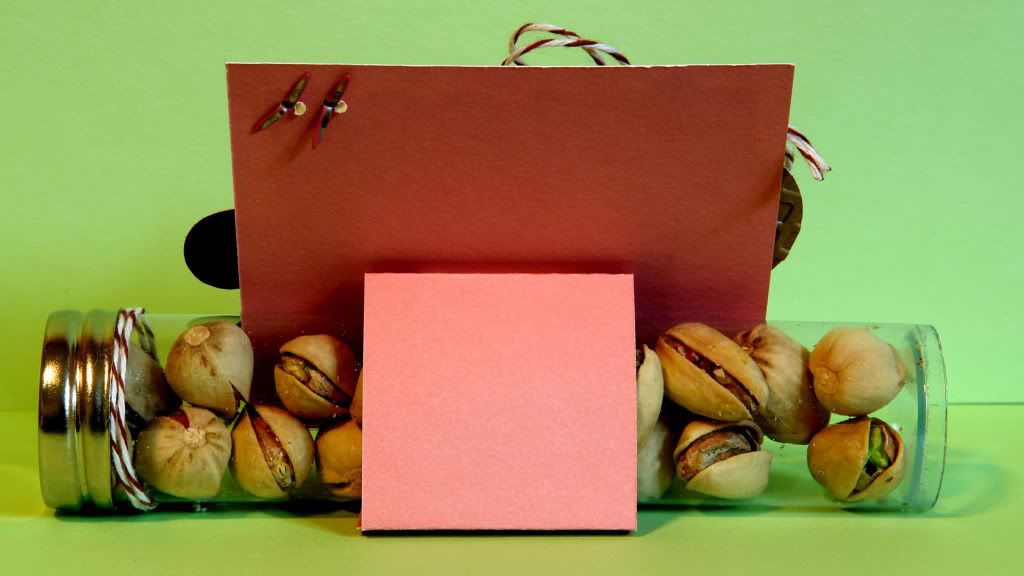
Back view
To complete this card:
I ran the acorn through my Cuttlebug using the tiny Mosaic A2 folder then sanded the front.  Stamp the message, (from Close to my Heart) in pink on a tag I cut myself and rounded the corners.  I then added chalks to the edges, pink brads to the top right corner and brown bakers twine to finish the card.  I filled a tube with pistachio nuts and tucked under my easel tab at the back.

Keep reading two more post below.


Catch the Fenzy!
Related Posts Plugin for WordPress, Blogger...