Showing posts with label Tags. Show all posts

Saturday, March 19, 2016

Little Birthday Mouse...

Quickly sharing my creation for the weekly sketch at From the Heart Stamps

Sketch #143 - the Twist: Use embellishments from your stash
You can find the challenge HERE and the sketch below
 
Here's my little tag...
 
 
I decided to make a little birthday tag 3.25" x 3.75" using Kraft cardstock. 
 
I am using Mouse Balloon today. I colored the image using the following Copic markers: Blender, BG01, BG05, E00, E31 and E33

I used scrap pieces of cardstock from my stash, following the sketch design.  I finished the tag with a yellow button and white jute, also found in my stash


You have one more day to join the weekly sketch challenge.  Also, make sure to check out the SHOP, you will find several NEW images for Spring.
 
Thanks for coming by...
 
Karen

Friday, November 8, 2013

Something from My Kitchen

I just wanted to share a quick little tag and goodies I made this week in appreciation of a co-worker
This co-worker is male, he loves to bake, as much as I do and he wears bow ties on occasion
 
Before work on Monday morning, I baked up a batch of Peanut Butter Cookies
 
 
I have always enjoyed baking and this recipe was in a little cookbook my mother had in our kitchen
This cookie recipe is the very first cookie recipe I made as a young girl, around age 9 or 10
My mother has since passed on, but I want to see if I can find this cookbook in their kitchen
It is easy to remember, quick to make, and very tasty
And no flour for those who want something without gluten (see recipe below)
 
 
Quickly made this tag to add to the package of cookies, attached with turquoise bakers twine
Dollar Store Washi tape, which I just love these colors and the pattern
Felt bow tie from my stash and rhinestones to finish the tag
 
Peanut Butter Cookies

1 Cup Peanut Butter
1 Cup Sugar
1 Egg
1 tsp. vanilla
 
Preheat oven to 350 degrees
Mix all ingredients together until smooth
Place in refrigerator for 5-10 minutes for easier scooping
Using a scoop or hand roll into 1 Tablespoon balls
sprinkle with sugar and slightly press cookie down with fork tines
Bake for 10-12 minutes
Yield: 2.5 dozen cookies

 I hope you enjoyed my quick post
and
 if you have a chance to make the cookies, tell me what you think

Thanks for coming by today - Catch the Frenzy! - Karen

Sunday, September 1, 2013

Holiday Tag Challenge at Moxie FAB World

 
I have created my project for the Holiday Gift Tag Challenge over at  Moxie FAB World
 
This is my first time playing along at Moxie FAB World
 
I've been to the site before, but with Design Team obligations and working full time, I seem to run out of time to play in their challenges, and many other challenge sites as well.   There is so much information, sharing and fabulous inspiration on the site, I was really enjoying looking around. But, I am down to the wire with getting the Holiday Tag done and submitted before the September 2, Midnight EDT deadline, so here it is, I hope you enjoy it!


Here's my tag...

...which I made using a soup can pull tab for the top - a good Up-Cycle embellishment
I love using these pull tabs and adding them to the tags I make
Check out my previous tutorial posts for more soup can pull tab projects HERE


 Supplies I have used for this project:
3.5" x 5.5" white card stock base
All designer paper & sentiment from Simple Stories 6" x 6" paper pad - HOMEMADE HOLIDAY
I finished the tag with banners, adhesive pearls and three colors of fibers to make my bow
To add the soup can pull tab, punch a hole and then attach to the top of the tag with a large white brad
Now it is ready to add to any package by simply tying it on with ribbon laced through the tab

I encourage you to take a look at the tags already submitted, be inspired and play along at
Moxie FAB World
You'll might even get a few tags done before the holiday season arrives
 
Oh and BTW...the winning entries will receive a copy of Holiday Cards & More, Volume 8
 
I have my fingers crossed :)
 
Don't forget to check out my other 3 projects from 2012 using soup can pull tabs
See the link above
 
Thanks for stopping by and checking out my Holiday Tag
 
Catch the Frenzy - Karen

I am also entering this tag in the following challenges:
Hobby Cutz Challenge - #14 - Recycle - (I used the soup can pull tab)

Saturday, January 5, 2013

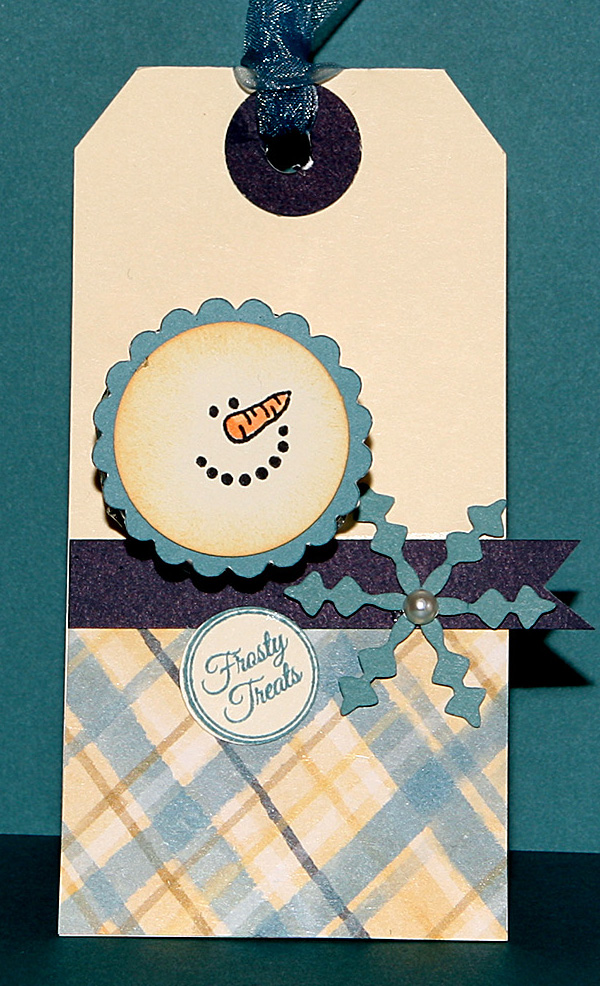
Some Frosty Treats...

It's been really frosty in my part of the Pacific NW the last few days.
I am drinking my coffee and cuddled up in a blanket to take the chill off.
No plans today, which is great because I feel like being lazy!
 
But, I did want to share a cute little tag with a treat I made for all 60 co-workers at school.
 
 
Supplies used:
Tags were a find at a yard sale - approximately 2-1/2" x 3-1/2"
All paper from my Close to My Heart stash
Navy cardstock cut 1/2" x 3" for banner, clip the ends with a square punch, also a 3/4" circle punch
Designer Paper cut 2" x 2-1/2"
Cream cardstock - after stamping/coloring image punched out with a 1" circle punch
Snowman face is an old CTMH set - black ink and colored with Copic markers, YR02, YR04
Twilight cardstock I used the following Cricut Cartridges:
Elegant Edges - page 23 <Sclopl-s> cut at 1-1/2"
Joys of the Season - page 61 <Flake-4> cut at 1-1/2"
Frosty Treat sentiment from Jaded Blossom - Winter Candies - Twilight ink on cream cardstock
Finishing Touches:
Sponged Creme Brulee ink around the snowman face
Adhesive pearl to snowflake center
Twilight ribbon to my tag
Adhered the Snowman face to a Pearsons mint pattie
 
 
I thought the tags were so cute laying all over my work table, so many cute snowmen smiles!
 

Here's a close up of the finished tag.
Mint pattie under the snowman face and I added a label to the back side that read:

Happy New Year
Thank you for your Commit "MINT" to our students.

I really hope you have enjoyed my little share today.  Thanks for stopping by!
Have a great weekend and and don't forget to Catch the Frenzy! - Karen
 

Thursday, June 7, 2012

Thursday Craft 'n Chat at ME4Y

The project I am sharing today for the Made Especially For You Thursday Craft 'n Chat is tags
 Not just any tags, but tags using an interesting little embellishment 
I was first introduced to this little embellishment by a fellow DT member at Colorful Creations
The first time I used this little embellishment was for a up-cycle project I made for a Blog Hop

It's the little pop top tab on a can of soup, vegetables or pop can
I had so much fun making a tag for the FCCB - "Save the Earth" Cricut Crawl in April
I received many positive reactions to my tag and clever use of the pop top tab
I hope you will be inspired to save those tabs and create a project of your own


A list of supplies needed to create my tag sample:

I used recycled cardboard for the base of my tag

I used a recycled checked shopping bag for my background paper
You can also use wrapping paper, bags, junk mail or other paper you have on hand

You will also need:  

Scissors, paper trimmer, 1-3/4" circle punch, small 1/2" circle punch and a tiny hole punch
Adhesive, medium glue dots, sponge dauber, distress ink, sentiment stamp
a die cut image and background for underneath ( mine is from Elegant Edges/Cricut cartridge)

Embellishments:

Jute, pop top tab, 3 flowers, large brad, 3 tiny buttons, chipboard butterfly


Trim your cardboard base to 3-1/2" x 6-1/2", as well as the background paper
Punch out a coordinating piece of cardstock using the 1-3/4" circle punch - cut in half
Cut a small 1/2" circle out of coordinating cardstock, to cover the lower part of the tab


Adhere the background paper to the cardboard
Adhere the large half circle to the top center of the tag
Using a glue dot, adhere the 1/2" circle into the lower part of the tab
This step is to cover the ragged edges of the tab
Using the tiny hole punch, punch through the layers on the tab and cardboard
Attach a large brad to the center of the tab


Using the sponge dauber and distress ink, sponge around the edges, stamp the sentiment
I also used the edge of the ink pad and lightly pressed onto the oval for some distress lines
Adhere the front and back of the die cut together


Adhere the die cut onto the tag and add the embellishments as shown in the photo

I hope you enjoyed today's project 
and 
have been inspired to use this unique embellishment on your next project

Scroll down for a few more samples


Thanks for reading my tutorial

Catch the Frenzy! - Karen
http://simplyfrenzied-karen.blogspot.com
Related Posts Plugin for WordPress, Blogger...