Showing posts with label Thank You Cards. Show all posts

Wednesday, September 14, 2016

Ladybugs...

Sharing a card I made for my Design Team inspiration post for Whimsie Doodles

I am using Ladybug Day found in the Summer Fun Digi's  tab in the SHOP

Our weather has been so lovely I wanted to make a summery, cheery, bright card
And these cute little ladybugs are a perfect choice

I made a simple easel style card with one of my favorite color combos...
Black, Red and White


The image was colored using my Copic markers:  B00, C-1, C-3, C-5, E31, E33, E35, G14, R22, R27, R29, Y11, Y15, YG06

I layered a black gingham strip from my scrap pile, over the top of a red scalloped border.  The image was layered on red cardstock. 

To finish my card, I stamped my sentiment with black ink and added a cute little stitched die cut heart. Confession time...the heart is covering an ink smudge, but I recovered well!

I hope you enjoyed my sharing today and make sure to visit Whimsie Doodles for other great cards from the rest of the Diva's, you will be inspired..

Be sure to join us on the 15th for our September Challenge.

Thanks for coming by - Karen

Friday, August 26, 2016

She has Wings with Thanks...

I am sharing another card this month for my Design Team inspiration for...

I am using the same image as I did at the beginning of the month
Why? She is cute and...
My printer wasn't working properly and the image was already printed, so there you go!
But she is cute!

She has Wings found in the People Digis in the SHOP


A sweet card using a white base and layering with green paper and dotted paper
I colored the image using my Copic markers in the following colors:
B000, E00, E02, E04, RV10, RV13, Y15, Y21, YG00, YG06, YR16
The card was finished using a "thanks" sentiment and green button tied with jute

I hope you enjoyed my quick post and make sure to stop over at Whimsie Doodles
So much inspiration from the rest of the Design Team, sure to inspire you

Thanks for stopping by my blog - Karen


Friday, August 19, 2016

Thank you so much...

Today is my Mid Inspiration Design Team post for the 

Here's my card...


We have challenge #78 - a Color Challenge - use at least 2 colors from this palette


Our wonderful sponsors for this challenge are:


and


For my card I am using the image, #607 Birdhouse 2 from Scribbles Design found HERE.  I decided to make a simple thank you card.  I sized the image to a postage stamp and mounted it with a scalloped edge frame cut from my Cricut. Lots of layers using my scrap papers. 

I colored the image using my Copic markers in the following colors: BG000, BG01, BG34, E11, E33, G000, R05, R11, R22

I finished the card with a Thank You so Much sentiment, carnation ribbon bow and some yellow brads.

I hope you like my card and that you will be able to join in on our challenge.

Thanks so much for stopping by - Karen


Friday, November 22, 2013

Thanksgiving or Thanks - Digi Haven Challenge

Good Morning, I am so glad you stopped by to check out my card sharing today
I have my Design Team card for Digi Haven to share with you
 
Another fortnight brings a new challenge
Our Theme: THANKSGIVING OR THANKS
 
Here's my card...
 
 
The Design Team was able to use images from Beccy's Place  - our wonderful Sponsor
 
 
For my card I used the Harvest Set
All papers from my scrap box
Copic markers used:  E00, E35, E37, G21, G99, Y08, Y17, Y21, YG63, YR00, YR02, YR04, YR07
Layered on top of burlap and finished with a wooden button and jute bow
 
I hope you like my card and remember to check out the rest of the inspiration from the Design Team
 
I invite you to join us for this fortnight challenge - I look forward to seeing your cards
Make sure to use a digital image and check out the simple rules HERE
 
Thanks again for stopping by today - Catch the Frenzy! - Karen
 
I'll also be entering this card in the following challenges:
 
Milk Coffee - Thanksgiving, Thankful, Thanks
The House that Stamps Built - DCC1120 - Giving Thanks


Friday, September 13, 2013

A Sketch Challenge at Digi Haven


Happy Friday everyone...Thanks for stopping by today!
I am so excited its Friday, as I am so ready for the weekend
 
Today starts a new fortnight challenge at Digi Haven 
and
this time we have a SKETCH CHALLENGE provided by DT member - Kevin McCrafty
 
Here's my card inspired by Kevin's Sketch (see sketch below)
 
 
I am using the Bird Nest image provided by our sponsor Beccy's Place
 
 
Kevin's Sketch
 
For my card I used the following Copic markers to color my nest:
B00, B12, E35, E50, E51, E53
Bird and branch chipwood laser die cuts from Quick Quotes - Bag O'Chips - Birds
I sponged the die cuts using Chocolate ink
Kraft cardstock from My Favorite Things
Designer papers from My Minds Eyes 6 x 6 pad - Paris & Co.
Sentiment from old CTMH - D136 Thank You set
Finished the card with ribbon, two brown buttons with cream floss in the center
 
I hope you will have a chance to make a card inspired by Kevin's sketch and play along with us
If you need some more inspiration - checkout the rest of the Design Teams cards HERE
 
Please remember to use a Digital image on your card
Checkout the HOW to PLAY tab for all the details
 
I plan to spend some quality time in my little crafty space this weekend making cards
I sure hop you all have some fun plan yourself - Enjoy your weekend
 
I can't wait to see what you come up with - until then...
 
Catch the Frenzy! - Karen

Challenges I have entered this card into:
Beccy's Place - September Challenge

Tuesday, September 3, 2013

Technique Time Tuesday

 
Today is the first Tuesday of the month, which brings a new technique for you to try
 
This month at Technique Time Tuesday we are playing with a technique called...
 
Faux Silk
 
Here's my Design Team card I made using the Faux Silk technique
 
 
Both the flower image and sentiment are from Close to My Heart (old stamps from my stash)
I used White and Kraft cardstock for my card
The image was colored using my Copic markers:  BG10, BG15, BG23
I finished the card with 3 different Washi tapes
Lavender adhesive rhinestones and lavender floss
I also added a touch of glitter to the center of the flower

 
This is a close up of the flower so that you can see the texture you get with this technique
 
Make sure to check out the tutorial on the blog
I know you will be inspired by the creations the Design Teams has shared
I hope you will be able to join in and play along this month
It is always so much fun to learn a new technique and share with others
I look forward to seeing what you all come up with using the Faux Silk technique
 
Thanks for stopping by today - Catch the Frenzy! - Karen


Tuesday, April 30, 2013

#116 for Try Stampin' on Tuesday

Here's my card for this weeks sketch (see below) for Try Stampin' on Tuesday


Sketch #116 - I hope you will enjoy making something with this sketch as your inspiration

 
So sorry to have such a short post today...   I had an extremely busy weekend
Friday night out with friends, Saturday all day Women's retreat at church and I ran a 5K on Sunday
A lot of things just didn't get done and of course I had to work today - so now I need to get them done
 
I do hope you will visit the blog at Try Stampin' on Tuesday
Check out the rest of the Design Teams creations
 
BE INSPIRED!
Thanks for stopping by today - Catch the Frenzy! - Karen

Tuesday, February 26, 2013

Try Stampin' on Tuesday #107

This week at Try Stampin' on Tuesday brings another new sketch for you to try.
 
I love using sketches, as they give you a starting foundation for a card that you can build on.
I find that fun to work with and quick to make.
I hope you enjoy using our sketch #107 this week to create something wonderful!


My card using an image from SKdigis called Heart Dandelions


To make my card I started with a white A2 card
Covered with wood grain designer paper from Authentique 6 x 6 - Celebrate
The striped paper from Authentique 6 x 6 - Celebrate, as well as the blue center strip
I colored the image with the following Copic markers: R11 and R27
Sentiment from my stash of old Close to My Heart stamps
Finishing touches, red button with white ribbon bow
 
Quick and simple, with great results!
 
I hope you liked my card share today.
So now, head over to Try Stampin' on Tuesday and check out all the DT creations.
Be inspired and join us this week for our sketch #107.
I am looking forward to seeing what you come up with.
 
Catch the Frenzy! - Karen


Sunday, June 24, 2012

Made Especially for You

Our weekly challenge at Made Especially For You, week four, create a card using a specific technique.

This week we are using the technique of heat embossing.
I haven't heat embossed for a really long time and only had a few powders on hand.
I fired up the old heat tool and I chose to work with white powder on kraft paper.


To complete my card I sponged around the edges, added a ribbon bow, and adhesive pearls.

Our wonderful sponsor this week is Adams Acres
One randomly chosen winner will receive a $10.00 gift certificate to their store.


Come on over to ME4Y and play along with us.  
We would love to see your creation use heat embossing.


Catch the Frenzy! - Karen

Tuesday, May 15, 2012

Challenge at ME4Y

I used the Thanks a Bunch from Make it Snappy- Frame it


It's Made Especially 4 You sketch challenge week.  Create a card using the following sketch:


Our sponsor this week is Bugaboo Stamps,
where one randomly chosen winner will received 7 digital images of their choice.


In addition to the sponsor's prize, we'll be giving away an EXTRA prize this week to a second randomly chosen winner!  This second winner will receive the following two Lucky 8 Punches:
Floral Burst and Tatted Doily
Make sure to check out the inspiration for this challenge from our Design Team using images from Bugaboo.

Thanks for stopping by today.

Catch the Frenzy!


Tuesday, March 27, 2012

The Bold and The Beautiful

Over at CAS-ual Fridays they are having  challenge #CFC45:  The Bold and the Beautiful.  Create a Clean and Simply project using pastels and black.  This really has a stunning effect.

I started with a 3-1/2" x 8" white cardstock.  I layered it with a 2-1/2" x 8" black cardstock.  The 3 pastel squares are cut at 2-1/4" x 2-1/4".  I used a Close to my Heart flower image and stamped it three times on co-ordinating gingham paper.  Cut these flowers out, added a matching large brad to the center of each.  Stamped the sentiment in black and finished with black bakers twine.

Catch the Frenzy!

Tuesday, March 13, 2012

Thanks for Everything - ISSC06 Challenge

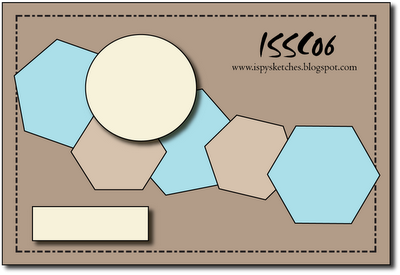
Another iSpy Sketches Challenge #06 based on the below sketch from Patter Cross.  The Octagon shape was intriguing. Thanks for stopping by today and please stop by iSpy Sketches.

I used My George & Basic Shapes Cartridge for the <Octagon> shape found on pg. 107 and I cut three at 1-1/2" and two at 1" in coordinating colored pattern paper.  I also used this same cartridge to cut my circle, which is found on pg. 108 and cut the red one at 2-1/2" and the pattern one at 2".  The last Cricut cut was the <Flower1>, pg. 120 in which I cut three at 1-1/2".


I stamped the sentiments in Chocolate ink , both from Close to My Heart on the smaller circle, and on white cardstock, which punch to make a banner.  All pieces layered as shown in the photo. 

Finishing touches, added chocolate brads to the center of the three layered flowers, to the right edge of the circle and to the center of my Bon Bon (DoodleBug Design) twine bow.

Catch the Frenzy!

Monday, January 2, 2012

Thank you

Happy New Year everyone!  Welcome to "Simply Frenzied", so glad you stopped by, as I am excited to share my first card in today's post.  One of my New Year's resolutions is to try to use supplies and products I already have on hand.  I have been creating cards for over 20 years, and until recently, I was a Close to My Heart consultant.  My inventory of papers, stamps, inks and assortment of accents is extensive.  Again, the plan is to create cards and papercrafts with items I have on hand.  I hope to list supplies, tools and brand names when possible.  However, the evolution of cardmaking and scrapbooking has changed over the past 20 years, so I may be kickin' it old school with some of my creations.  But, know that my goal is to share my passion for papercrafts, and to inspire you in your own unique creativeness. 
For this card cut as follows...

Base of card - cardstock:
Turquoise - 1 x 4-1/4"
White - 4-1/4" x 5-1/2"

Cricut cuts - cardstock:
Elegant Edges - page 59 <Flower2> - 4 inch
Frame feature

Simply Charmed - page 36 <Bird> - 2 inch
Layer 1 - Lt. Turquoise
Layer 2 - Red
Layer 3 - Turquoise
Layer 4 - Yellow
Shadow - Black


Other cuts:
1 inch flower punch - Lt. Turquoise
3/4" circle punch - Pink
1/2" circle punch - Turquoise

To complete the card...

Sponge Turquoise ink around the edges of flower pieces, layer 1 and layer 3 of the bird.

Sponge Red ink around the edges of the pink circle and layer 2 of the bird.
Using your favorite adhesive (I used my Xyron machine), adhere all pieces together, as shown in sample, working back to front.
Stamp "Thank You" (from Close to My Heart - D1361 Thank You set ) inside circle with Turquoise ink.

I added Red adhesive pearls from Recollections to the center of each flower and down the upper, left edge of the Turquoise paper.

All paper and ink from Close to My Heart.

Catch the Frenzy!
Related Posts Plugin for WordPress, Blogger...