Showing posts with label Valentine Cards. Show all posts

Tuesday, February 14, 2017

Hogs and Kisses...

Happy Valentine's Day - sending you Hogs and Kisses as well!

Here's a quick share using the February Stamp of the Month image at...

I love playing along, as it is a progressive challenge
Entry = next month SOTM for FREE

Check out the details HERE - There is still time to play along

Here's my card
Let me know what you think, as I love reading your comments


Hamlet Hogs & Kisses is so cute...check out the store for all Pigwits images. 

I started with a white A2 base, layered with lavender cardstock, patterned paper, and some red with pink heart patterned paper too.

I colored the image with my Copic markers in the following colors:  BV00, BV02, BV04, C0, C1, C3,E000, E00, E02, R22, R27, R29.  I then cut the image out and mounted to the card.

To finish, I added a sentiment from the set, a lavender ribbon with bow and some pink enamel hearts.

I hope to enter this card in the following Challenges:


Thanks for coming by tonight,

Karen


Sunday, February 12, 2017

Bunny Love...

A quick card share for the  Weekly Sketch Challenge at From the Heart Stamps
I was so busy this week, and hadn't had time to create until this afternoon
I am really cutting it close to the deadline, but I gone it done...WHEW!

I am using this cute little image called Bunny Love  - it is a FREEBIE
Make sure to check the SHOP for all the quirky and cute images


I used a white base, layered patterned paper over the top, following the sketch, which I rotated.

I colored the bunny in the following Copic makers:  E00, E11, E21, E31, R11, R22, R27, R29.

I finished the card with a sentiment from this set, cut out the bunny image and mounted onto the card. I then added some red jewels for a little sparkle.

Here's the sketch


I will be back to share a few more Valentine/Love cards this week.

Thanks for stopping by tonight,

Karen


Wednesday, February 8, 2017

I Wuv You Bunny...


Good Morning...

I am so happy to be back as a monthly Guest Designer over at Missy Daisy StampsI design exclusively for Jennifer Nilsson Art and today I am using I Wuv You Bunny

This little bunny just warms my heart.  I hope you enjoy my card and can the warmth too!


I wanted to use the classic Valentine color combo of Red, Black and White for this card. I started with an A2 white base, stamped a heart sprinkle background image in black ink, randomly on the card. I then layered with a patterned paper 3.5" circle, cut from a die and a 1.25" x 5.5" solid black strip.

I added a white Love sentiment (a Memory Box die), to the strip.  I really like the contrast against the black.

The I Wuv you Bunny was colored in the following Copic markers: C-0, C-1, R11, R22, R27, R29.  I fussy cut the bunny and mounted onto the card.

To finish the card, red sequins for a pop of color!

Thanks for coming by today and make sure to check out all the Jennifer Nilsson Art images sold exclusively at Miss Daisy Stamps, where you will also find images, sentiments, card kits and digital papers from both Miss Daisy Stamps and We are 3 as well.

This card is entered over at
Cupcake Inspirations - challenge #CIC394 - color challenge
Come and Get it Challenge - Love is in the air

Have a really wonderful day - Karen

Thursday, June 23, 2016

I've Pollen for You...

New post today for my Whimsie Doodles Design Team Inspiration

I am using this sweet image called Pollen for You 
It can be found in the This and That section in the SHOP
More of a Valentine card, but what can be more summer than Bee's and Pollen?


My yellow A2 card base is layered with lighter yellow, cut with a honeycomb die pattern
This die set is called Distressed Baptisia Collage from Memory Box
There are 4 patterned corners to use, I couldn't wait to try the honeycomb on this card
Such a fun element for a card...Love it!

I colored the image using the following Copic markers:
 B00, C-1, C-3, C-5, G14, R22, R27, R29, Y08, Y15, Y17, YG00, YG06

Finishing touches: Sentiment banner, red button and twine

Make sure to check out the Blog and join us in our monthly Challenge

Friday, February 19, 2016

Another Happy Valentine's Day...

Today's Design Team post...my Mid Inspiration for Challenge #65
Theme - Valentines/Love 

 
Our sponsors are...
Etsy Shop and Blog

For my card I used a 6" x 6" grey base, layered with patterned paper from Doodlebug Design 6" x 6" pad called "Sweet Things" 

I colored this image from Julia Spiri, which can be found HERE using the following Copic markers:
Blender, C-0, C-1, C-3, BG000, BG01, BG05, E00, E21, E31, E33, E53, G00, G02, RV21, RV23

My finishing touches: layering white heart doily, and stitched hearts cut from Memory Box dies, sentiment banner and buttons

Join us for the last week of Challenge #65, you will find the post HERE.  Check out the other Design Teams creations and get inspired.  Come play along with us, we would love to have you.

Grateful you stopped by today.  Leave a comment, they are always appreciated.

Karen

Sunday, February 14, 2016

Sweet...

My share today is for the weekly sketch challenge at From the Heart Stamps
 
This week we have sketch #138 and the TWIST: Make it a Valentine
 
You can see the sketch below and find the challenge HERE
 
 
My card is a standard A2 black base, with a layer of pink on top.  I used patterned paper from a 6 x 6 pad by American Crafts called XOXO for the sketch layers.
 
My image is from the set Ali's Paper Hearts.  I colored the image in the following Copic markers:  C-0, C-1, C-3, C-5, RV02, RV04 and RV06.  I added little white dots to the puppy's muzzle for added character.
 
To finish the card, a little sentiment tag and 3 pink, glossy hearts.  It is a SWEET card!
 
From the Heart Stamps had a Blog Hop last week and I won a FREE image!  Looking forward using it soon and sharing with you all.

Entering this card in the following Challenges:

Love is in the Air - Come and Get it Challenges
Add Hearts - Crafting When We Can
Love is in the Air - Glitter 'N' Sparkle
 
Thanks for stopping by today...and Happy Valentine's Day!
 
Karen
 

Tuesday, February 9, 2016

You have my Heart...

My card today is just a fun Valentine's Day card I made for the challenge over at
The monthly challenge for January - Hearts A Plenty, found HERE

 
The image I used is called Mailed my Heart, found on their FREEBIE page.  She is adorable and I enjoyed coloring her and practicing my black hair skills.
 
I used the following Copic markers:  Blender, C-0, C-1, C-3, C-5, C-7, BG000, BG01, BG05, and E000, E00, E02, RV02, RV04
 
The card is a standard A2 grey base with layers of paper from a 6 x 6 pad from Doodlebug Design, Inc. called Sweet Things.  I used my Cricut to create the bottom scalloped edge.
 
To finish the card, Stitched Hearts, a die from Memory Box, and a banner die and sentiment from My Favorite Things.
 
I hope you enjoyed my card share today.  Please leave a comment, I love reading them.  And thanks for coming by today.
 
Karen

Sunday, February 7, 2016

Happy Valentine's Day...

My share today is for another sketch at From the Heart
 
This week is sketch #137, which can be found HERE
 
The TWIST this week - Hearts, Hearts and more Hearts (see sketch below)


I started with a grey A2 base.  I then layered with papers from Doodlebug Design, Inc. 6 x 6 pad called Sweet Things.

My image is a FREEBIE offered at From the Heart Stamps, called Kitten and Heart. I colored the image using the following Copic markers:  Blender, C-0, C-1, C-3, RV02, RV04.  Sentiment is found in a set call Heart Bandit.

I finished my card with a ribbon bow and pink sequins.

Another great sketch.  I love playing along and aim to finish my cards prior to the last day of the challenge, however, working full time, I can't seem to get into my craft room until the weekend.

Come play along, because guess what? Everyone who does...we get $1.00 discount to use in the store.  The discount expires after 1 month, however there are many $1 snowmen in the Project 100 Snowmen section in the shop.
And they are really cute!

Thanks for coming by today, I appreciate you taking the time to leave a comment.

Karen

Thursday, January 28, 2016

Bee Mine

Good morning...today I am posting my first SPOTLIGHT post as a Design Team member for Kitty Bee Designs

Here's my card, using this cute little Bee and sentiment from the Bumble Bee set #1 - Adorable!

Check out the blog for more inspiration using Kitty Bee Designs.  Make sure to click on the SHOP tab, which will take you to the Etsy shop where you can check out other cute images for sale.


I colored the image using, the following Copic markers:  Blender, B00, C-1, C-3, C-5, Y08, Y15, Y17

I did a little paper piecing on the bee, cutting out the top of the head and the body to give it a dimensional look. 

My card is standard A2 card, cut lengthwise, 11" x 4.25" with the fold along the top of  the 4.25" side.  I layered with black & pink heart patterned paper from a 6" x 6" pad from American Crafts called XOXO

I added a strip of black cardstock and framed the Bee behind the Postage Stamp die.  The sentiment was added to the Banner die and tucked underneath the frame.  Both dies from My Favorite Things.

To finish the card, I added hearts in coordinator shades of pink, using a Memory Box die set, called Stitched Heart Layers.  This was a FUN card and this little Bee makes me SMILE!

Thanks for coming by today, hope you enjoyed my share and please leave a comment.

Karen

Thursday, February 13, 2014

Valentine Ideas

In my post today I am sharing two cards and one project I recently created
The cards and project were for my card making class I lead for a group of close friends
We have been doing our little class for at least 4 years and I have always enjoyed our time of creating
We always meet for dinner, having a relaxing time eating, chatting and catching up with each other
Then we head to my house for a little CRAFTY time
 
We started with this classic Red, Black and White card
I found some really fun chalkboard paper oval labels by Recollections
The sentiment is from My Favorite Things, inked white and white embossing powder
We finished the card with smudging white ink to give it that chalkboard look
Added a red grosgrain ribbon/bow and adhesive rhinestones
 
 
Next we made a really cute Valentine treat bag that I saw on PINTEREST
I little brown bag with a doily tucked inside
I used some coordinating Valentine paper scraps to cover the lower portion of the bag
Sentiment was stamped on red ink on the bottom strip of paper
I also used a circle sentiment from My Favorite Things attached to a toothpick
I tied a piece of twine around the toothpick and added 3 red rhinestones to finish the project
The treat bag is perfect size for a mini bag of M & M's
 
 
And the last card is my FAVORITE one, because it involves WASHI tape and the color PURPLE
 
 
Add three torn strips of Washi tape to the card in various lengths
I cut the heart from Cricut cartridge and added black doodle lines around the edge
Sentiment and hearts from My Favorite Things
To finish the card - pink button with twine bow
 
Entering this card in the following challenges:
Crafters Café - #50 Must have Hearts
Our Daily Bread - #190 Love themed/Valentine Non Traditional colors (No Red or Pink)
 Ribbon Carousel - #90 - use Washi Tape
 
I really hope you enjoyed my post today
I love each one of these cards/project and was so pleased with the way they turned out
I love sharing ideas and creations with others and appreciate you stopping by to check them out
Let me know what you think - Catch the Frenzy! - Karen


Tuesday, January 28, 2014

New Sketch for TSOT

Well yesterday (Monday), I had a long, boring day of waiting...
Seven hours sitting at the King County Regional Courthouse - Jury Duty... Oh Lucky me!
I was dismissed for the day around 3:00 p.m., however I need to possibly return today (Tuesday)
I am hoping when I check the website later on Monday evening, I will not need to return
 
Anyway, I have created a new card today for my Design Team at Try Stampin' on Tuesday
Team B has sketch #153 to inspire you this week (see sketch below)
The TWIST:  Keep Warm
 
Here's my card... A VALENTINE card, but I decided not to do the TWIST:  Keep Warm
But you know what? I think it may have the TWIST after all...
If you are hugging the one you LOVE, that would Keep you Warm, right?


I chose to do a classic White, Red and Black 6" x 6" card
 
My base is black cardstock layered with red cardstock cut at 5-12" x 4"
My designer papers - "Just Married" Collection kit by Echo Park
Cut two at 3-1/2" x 1-3/4" and cut the other two at 1-3/4" x 1-1/2"
This kit contained stickers to use, so I layered the sentiment banner on top of red cardstock
Using scissors, I trimmed the edges to match the banner sticker
 
To finish the card: 
Using a heart punch - punch out three hearts to add to the card
I scored both ends of the banner to attach it to the card with a slight curve to it
I added tiny adhesive pearls to both ends of the banner, and to the three hearts as well
I then added larger adhesive pearls to the top left corner of the card
 
This card was finished in less than 10 minutes and not a single stamp or digital image was used
 
 
There is so much more to see and inspire you on the Blog
Check it out and see what the rest of the DT from Team B has to share
 
I invite you to join us this week and create something awesome using sketch #153
 
Thanks for coming by today - Catch the Frenzy! - Karen

Tuesday, December 31, 2013

Valentine...

You have my Heart
 
Okay, so we aren't even into the New Year yet and already I have made a Valentine card
But, only because my sharing today is a Design Team card for Try Stampin' on Tuesday
 
Today starts a new challenge with Team B using Sketch #149 (see sketch below)
The Twist:  SPARKLE it UP!
 
 
So here is my card...so Shiny and Sparkly!
 
Sketch #149
 
I started with a white A2 card for the base
Next I layered pattern paper from K & Company - Valentine by Kelly Panacci
The silver glitter paper was in my stash...sorry I do not know what company
Anyway, I used a Jumbo Scallop border die from My Favorite Things on the silver glitter paper
I also punched out 3 hearts from this silver glitter paper as well
Valentine sentiment from an old Close to My Heart stamp set - D129 February Word Puzzle
 
To finish the card:
I added my Sparkles - pink adhesive rhinestones
A metal tag with sentiment on it and red ribbon with the ends pulled through the hole of the tag
 
I am so glad you came by today and I hope that you will take the time to stop over at the blog
You will find more wonderful Sketch inspired creations by the rest of the DT on Team B
I also hope you will consider playing along with us - I would love to see what you come up with
 
Again - thank you for stopping by and Happy New Year!
 
Catch the Frenzy! - Karen

Friday, July 19, 2013

You've stolen My Heart - Digi Haven Challenge

Another fortnight challenge begins today - Friday 19, 2013 over at DIGI HAVEN
 
Our theme is ANY ANIMAL
and
 I am OH SO EXCITED to share my card with you today
 
Our sponsor for this challenge is MY GRAFICO
Our Design Team was able to play around with the WOODLAND ANIMALS set,
Which is totally ADORABLE and I fell in love with the cute little RACCOON
He has STOLEN MY HEART!
 
I started with teal 6 x 6 cardstock, layered with designer paper from Authentique - Celebrate
 
I printed the image at approximately 5 x 4 and copied it several times to get all the layers for piecing
 
The sentiment is computer generated by me
 
To finish the card I added a red heart punch for this cutie to hold, goggle eyes and rhinestones
 
I hope this card has stolen your heart as well
 
Thanks so much for stopping by today - I hope you all have a FABULOUS weekend
My hubby and I will be attending the Paul McCartney concert at Safeco Field - Seattle tonight
***AWESOME***

Now you can head on over to the BLOG and check out the rest of the Design Team inspiration
Please remember to use a digital image - check out the tab HOW TO PLAY
I look forward to seeing your wonderful cards

Catch the Frenzy! - Karen

Also entering my card in the following Fabulous Challenges:
Tuesday Throwdowns #156 - Anything Goes
TTCRD - Anything Goes
Sweet Stamps - #126 Anything Goes
LEJ Designs - #62 Anything Goes
Anything Goes - #97 Anything Goes
Rhedd and Rosie - #11 Anything Goes
Lady Annes Challenge - #10 Anything Goes
Crafts and Me - #138 Anything Goes
Crafting by Design - Anything Goes
DRS Designs Rubberstamps - #79 Lucky Stripe


Tuesday, May 14, 2013

Sketch #118 for TSOT

My Tuesday share today is for the Design Team at Try Stampin' on Tuesday
 
We have sketch #118 for your inspiration (see below)
At first I thought it was a little intimating, but I finally came up with my card
 
 
I started with white A2 cardstock and added a pink layer and all my stripes are from my scraps
Sentiment and branch / owl image from Crafts Meow "Happy Owlentines"
I colored the images with my Copic markers in the following colors:
E50, E53, YG23, G14, R27
I added some doodle lines to the leaves and paper pieced with mounting tape for added dimension
Finished with googly eyes
 
What a fun card and I hope you will be inspired to create something using our sketch this week
 
 Sketch #118
 
Make sure to check out the rest of the wonderful creations from the other Design Team members
I look forward to seeing what you come up with for your take on Sketch #118
 
Catch the Frenzy! - Karen

Thursday, February 14, 2013

Fun Little Valentine Treats

Happy Valentines Day!
 
I have two little Valentine treats to share today.
These were part of the projects I made for my card class last month.
 
They both are made with metal dies from My Favorite Things
These two dies were so much fun to play with, along with the Lollipop Additions-Love stamp set!

 
I hope you enjoyed my quick little post today, short and sweet!
 
May your day be filled with Love, Hugs and Chocolate!
 
Thanks for stopping by today - Catch the Frenzy! - Karen

Sunday, February 3, 2013

L O V E and new DT

I am now a new DT member at Scrappy Frogs Challenge Blog

Scrappy Frogs offers a variety of challenges for everyone.
The Challenges are posted 1st Monday of the month - 2/4/13 starts our PINK and RED challenge.
Scrappy Frogs a place to challenge yourself, be inspired, as well as a place to just have FUN!

Here's my PINK and RED card for the challenge with KRAFT


To make my card:
Start with an A2 Kraft cardstock base - cardstock from My Favorite Things - found HERE
Designer Paper 12 x 12 paper pad from K & Company - Valentine by Kelly Panacci
For scalloped edge - Cricut cartridge - Just Because Cards page 42 <Truck-s> cut at 4"
For hearts - Cricut cartridge - George & Basic Shapes page 119 <heart2> cut at 4", 3-1/2', 2-1/2"
Sentiment from My Favorite Things - Homespun Hearts - found  HERE
Tuxedo Black ink - Memento
 
My finishing touches:
Pink ribbon and bow, pink adhesive rhinestones, banners and scrabble wooden letters
L O V E
 
So please join me and the rest of the Design Team for this months challenge at Scrappy Frogs
 
PINK and RED
 
I look forward to seeing what you create.  Thanks for stopping by today.
Catch the Frenzy! - Karen
 
I am also entering this card in the following challenges:

Polka Doodles - Week 5 - Lots of Layers + Pink and Red
My Time to Craft - #207 - Love is in the Air
My Sheri Crafts - #103 - Valentines
Dynamic Duos - #38 Real Red and Pretty in Pink

Friday, February 1, 2013

Be Mine

The theme for this fortnight challenge at Digi Haven is LOVE or VALENTINES

Our sponsor for this challenge is My Grafico

 
My Grafico is donating one set of Digital Stamps to the random.org winner of this challenge
To be eligible to win the prize - please follow the rules in the How to Play tab
And remember to use a DIGITAL IMAGE/stamp following our theme LOVE or VALENTINES

The Design Team was able to use Valentine Teddy digital stamp set to create our projects

Here's my card...
I hope you enjoy what I have to share today.  I really love Red and Purple together


 Supplies used to make this card:
A2 white cardstock base with 3-1/2" x 4-1/4" purple gingham DP
Cricut cartridge - "Elegant Edges" page 37 <stamp-s> cut at 3-1/2" -lavender cardstock
2-5/8" white cardstock square
Images colored using my Copic markers:
BV13, BV23, BV31, G00, G02, R22, R27, R29
Sentiment from Jaded Blossom - Simple Sayings-Valentine edition found HERE
Finishing touches:
Bright RED ribbon/bow, adhesive rhinestones, tiny pearls and lavender floss bow

Make sure to check out the creation from the rest of the Design Team using this adorable set
Visit their blogs and leave some comment love!
Get inspired and create something for your Valentine!

I am also entering this card in the following challenges:

By the Cute and Girly - Roses are Red
Ready Teddy Go - #19 Love is in the Air (use a teddy)
Milk Coffee Challenge - Valentines

Thanks again for stopping by - Catch the Frenzy! - Karen


Friday, January 4, 2013

SKdigis Sketchy Friday Challenge


I am so excited to be back on the SKdigis Design Team
 

It's Friday and Welcome to the first SKdigis Sketchy Friday Challenge
You will find all the details HERE

I love this sketch!
 
 
And here's my card using Heart Dandelions
 
 
I just love the way my card turned out and these colors together are amazing!
 
I printed the image and using a circle cutter, cutting the image at 3-1/4"
Copic markers used:  C-1, R20, R29, R59, RV10
The scalloped circle is from Cricut cartridge - elegant edges, page 64 <Ctrus1-s> cut at 3-1/2"
Designer Paper from KC & Company by Kelly Panacci 12 x 12 Valentine paper pad
Cardstock from my stash of Close to My Heart papers
Sentiment:  The Crafts Meow - Stitched Sentiments Two
Other supplies used:  Glue dots, 1" square punch, organdy ribbon, buttons
 
Make sure to check out the rest of the Design Teams creations.
I sure hope we will inspire you to create something wonderful using the sketch.
There are a bunch of FREE SKdigis you can download and play with...try them out!

And now, is your time to link for a chance to win..

I am also entering this card int he following challenges:
 
Alphabet Challenge  - X for X marks the Spot (and Stripes!)
Stampin' for the Weekend - Anything Goes - use a stamp or digi image
 

Thanks for stopping by today and enjoy your weekend!

Catch the Frenzy! - Karen

Tuesday, February 14, 2012

Happy Valentine's Day

One last Valentine card to share...

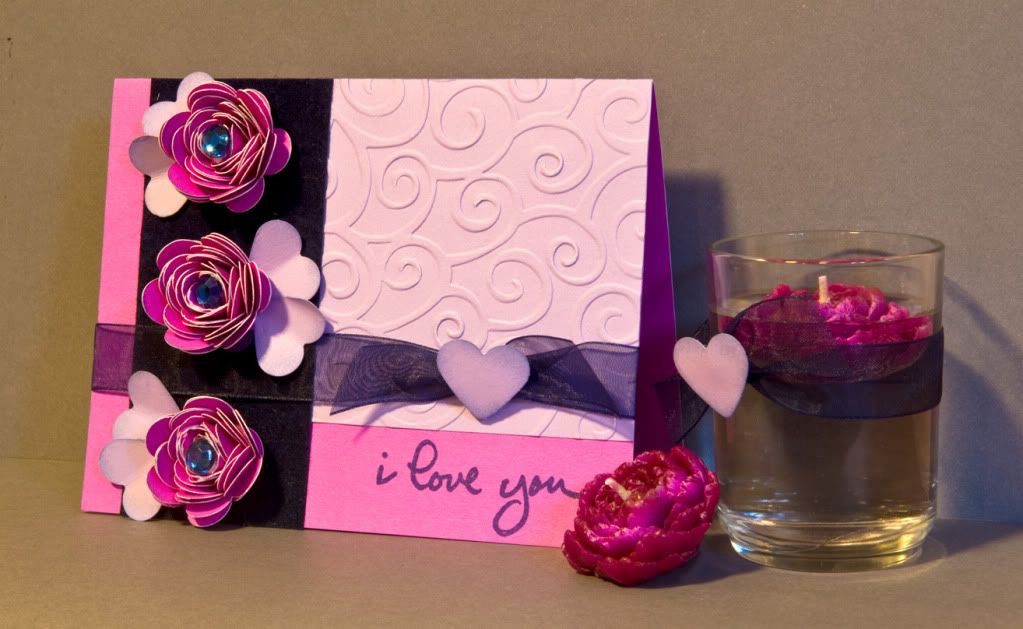
I wasn't going to post today, but since my hubby and I had no plans for Valentine's Day, as I am still recouping from a Medical procedure I had on Monday morning, I decided to share a card that was inspired by two little rose candle's a co-worker gave to me as a gift at Christmas.  She found them in a shop in Ashland, OR and they are so sweet (Thanks Kim!).  Shortly after getting these candle's, I received my Flower Shoppe cartridge in the mail and wanted to play around with making some roses.  Anyway, the result is the card pictured below.

To make this card:

A2 bright pink cardstock for base of card.  I used the Flower Shoppe cartridge to create my roses in the same bright pink color, adding blue rhinestones to the center of each rose.  I ran a light lavendar paper through my Cuttlebug using the swirl folder.  The dark blue paper is a velvet peice I found in my stash of paper. 

To complete this card:

I used a heart punch to create the light lavendar leaves, sponged around the edges with Navy ink and stamped the message in the same ink color.  I also added a dark blue ribbon to the card.

I hope each of you enjoyed your Valetine's Day with your someone special.  My someone special just arrived home with my favorite ice cream - Mint Chocolate Chip!  He is so good to me!


Catch the Frenzy!

Sunday, February 12, 2012

3 Valentine shares

Thanks for stopping by today...I have 3 Valentines and one tutorial to share with you


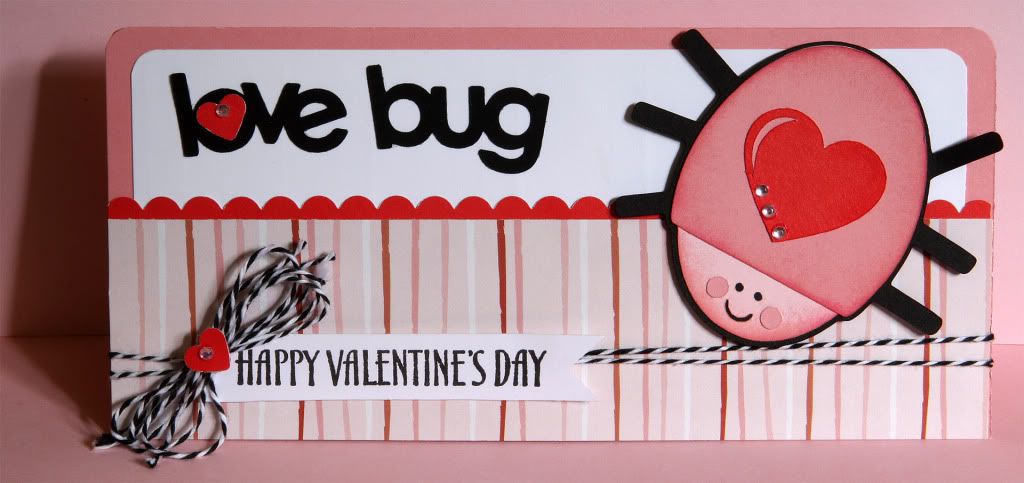
1.)  Love bug

This one makes me smile :) and the colors are one of my favorites together... Black, Red and Pink.  This card will be entered in the Fantabulous Cricut Challenge #97 - Love is in the air (use a heart) check out all the other fabulous ideas at on their blog.

To make this card: 

Start with a pink 7" x 8" cardstock folded in half for the base.  I rounded the top corners of the pink base, as well as the white 2" x 7-1/2" piece.  Next I trimmed a 8" x 1" piece of red cardstock with my scallop scissors.  The piece is striped pattern paper is cut at 2" x 8".  All paper is from my stash of Close to My Heart products.  Layer pieces together as shown in photo, working back to front.


To complete this card:

I used the Simply Charmed cartridge, page 31 <Lovebug1> cut at 3", all layers, shadow and word.  Sponging around the bug in darker pink ink.  I stamped the "Happy Valentine's Day" message (CTMH) on white cardstock and clipped the ends with a square punch to make it into a banner.  I wrapped black bakers twine (Doodlebug Design, Inc) around the bottom of the card, added a bow, small heart punch to both the bow and the "O" then blinged my love bug and hearts with pink rhinestones.
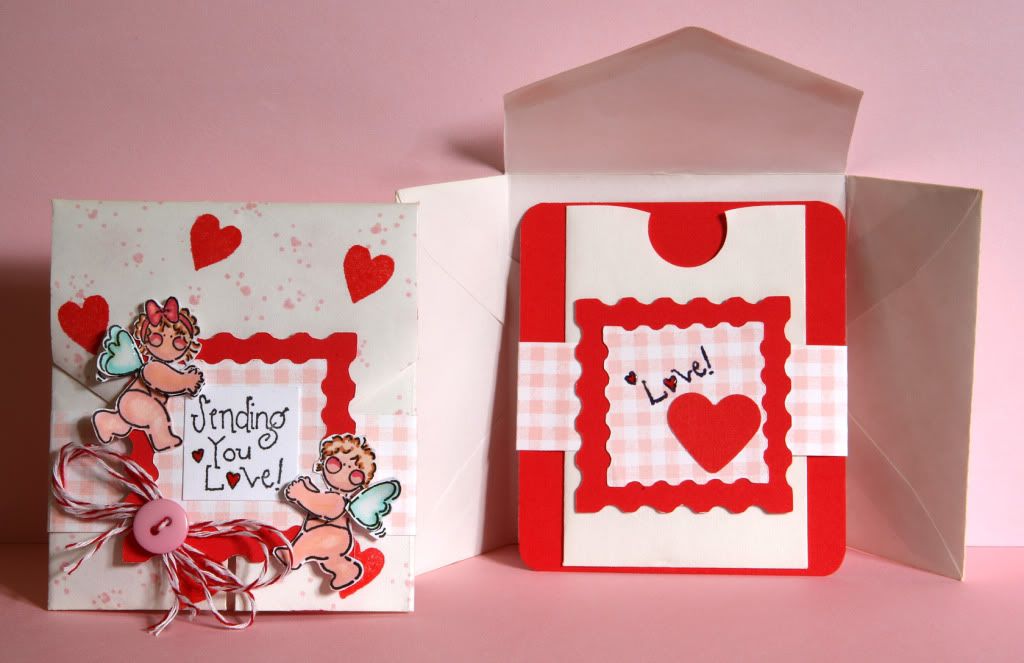
2.)  Sending you love - envelope creation for gift card

This idea is something I have been making for 10+ years when I want to give a gift card to a friend.  I haven't played around with the tutorial video idea yet, so I will explain it with pictures below.  I will be entering this card in My Craft Spot Challenge #43 Valentine's Day (card or treat packaging).

To make this envelope and card: 

Use a standard 3-1/2" x 6-1/2" white envelope, keep the flap open and random stamp the entire envelope, front and back.  I used a really old Close to My Heart background stamp (well love & well used) with a tiny heart cluster pattern with pink ink.  I then went back and filled in using a bold heart stamp from Impress with red ink.

I then cut two sets <Stamp-s> page 37 from the Elegant Edges cartridge, two at 2" red cardstock, the other cut two at 1-1/2" pink gingham pattern paper.  One set for the decorative flap and the other set for the inside card holder.  I also have two 1" x 9" pink gingham pattern paper strips that a wrapped around the envelope to hold side flaps in place, and repeated idea on inside card holder.

To complete this card:

I used black ink to stamp the "Sending you Love!" message (CTMH) on white square and marker to ink on the word "Love!" only for the inside card holder piece.  My two little cherubs (CTMH) were colored and shaded with my Tombow markers (I so want to purchase some Copic markers soon), cut out the cherubs, extra wings and arms for dimension. Layer all pieces as shown in photo.  Only adhere the top portion of the stamped Cricut cut to the flap.  For the inside gift card holder I adhered a small envelope I had in my stash for goodies.  I punched the top with a circle punch so it would be easier to pull out the gift card.  For finishing touches I added a heart punch to the inside gift card holder, red baker twine bow with button and glossy ac
cents to the wings and tint hearts in message.

Read more on How to make the envelope and to see the third share.
Related Posts Plugin for WordPress, Blogger...