Showing posts with label Simply Charmed. Show all posts

Monday, August 20, 2012

National Tooth Fairy Day


My share this week for , Challenge #125 "National Tooth Fairy Day"
Make a card using a Tooth Fairy, Tooth or Smile.
How fun is that? And I was also given a little stamp set to work with.


Using Tooth Fairy from our fabulous sponsor this week...


Jaded Blossom Blog
Jaded Blossom Store

To make my card I started with an A2 card, red cardstock

Cricut cartridges used:
Simply Charmed, pg. 53 <paper> cut at 4" on white, also shadow feature using aqua
"Just Because" Cards, pg. 42 <Truck-s) cut at 4-1/2" for the striped scalloped edge
Elegant Edges, pg. 59 <Flower2> cut at 2-1/2" using the frame feature, red flower

Next steps:
I rounded all corners of my papers, which were scraps from my stash
Using Sunny Yellow ink, sponged around the note paper
Tooth image sentiment stamped with Momento Tuxedo Black ink
Colored image using Copic markers:  BG10, RV10, RV29, Y02, Y08, Y17 and Colorless Blender
Cut image out and layer all paper as shown in photo, working back to front.

My finishing touches included:
Black and white doodle lines
Glitter and rhinestones on the crown and wand
aqua bakers twine and red/white jumbo paperclip
And the last thing I added was a little treat container from Stampin' Up
I tucked two quarters inside and attached with mounting tape

This was a really fun project,
 again I had to be really creative, as I do not own any of the Boxes, Bags and Tags cartridges.

I can't wait to see what you come up for this challenge.

Have a great week - Catch the Frenzy! - Karen


Monday, August 6, 2012

Make a Splash...

This share is for my Design Team post for Fantabulous Cricut,
Challenge #123 - Jump In and Cool Off!
Make a project with a water theme (pool, beach, water park, etc...)

I have to admit that some of these challenges really are challenging for me.
I do not have many cartridges, so I really need the Creative Mojo at times.

Well, after looking through all my cartridges, this is what I made:


I used the "Simply Charmed" cartridge, page 50 <Sun2> cut at 1".
I also found this great slide in the 'Recess" Lite cartridge, cut at 4".
I eliminated his shoes and shirt, added sponging and doodle lines.
The sentiment was created by me on the computer.

Perfect water park slide!

Looking forward to seeing what you come up with.

Have a Fantablous Day...

Catch the Frenzy! - Karen

Monday, June 25, 2012

B-B-Q Time

This week at Fantabulous Cricut, Challenge #117 B-B-Q Time.  
Make a project using a hot dog, hamburger, etc... (BBQ or Picnic foods).  

Can be used as an invitation

For my card I used the Simply Charmed cartridge, 
page 49 <Hamburger> with all layers and shadow cut at 3"
My hubby add a piece of cheese as well

My finishing touches:
Sponging around the edges of all pieces
Doodle lines around the image using black to outline and white for hi-lights
Brown twine to attach the metal tag which I stamped the image
Black brads
Paper, ink and stamp from Close to My Heart

I hope you will have a chance to play along this week at FCCB
Make sure to stop by and check out our DT creations and get inspired!

Catch the Frenzy! - Karen

Saturday, March 17, 2012

Happy St. Patrick's Day

Get your GREEN on...  Happy St. Patrick's Day everyone and thanks for stopping by to check out my share today.  I'm posting rather late in the evening, but wanted to make sure I got my St. Patrick's Day card posted to my blog.  Todays' share is a card I made for Getting Cricky Simply Sunday Challenge. I also entered it at Lil Red Wagon  challenge #124 - Lucky You.  This week it was a color challenge using green, white and one other color.  I choose gold.  Enjoy!

I started with a white A2 card for my base.  I added gold cardstock cut at 4" x 5-1/4" and layered the green gingham patten paper on top, which was cut at 3-3/4" x 5".  I also cut a strip of green cardstock at 1" x 4-1/4" and added that to the bottom on the card.

I used the Simply Charmed cartridge and cut the <Leprchn2> on pg. 32 at 2-1/2" and layers 1, 2 and 3.  I also used <PotOfGld> on pg. 33 cut at 2-1/2" and layer 2.

To finish this card I sponged black ink on the pot and outlined both the pot and Leprechaun with my black .01 Micron pen.  I used gold adhesive rhinestones on the pot to represent gold, added a rhinestone for the button, as well as three more in varies sizes to the top right corner.  My sentiment stamps are from Close to My Heart.  I tied green bakers twine around the pot and the top of the card with a bow and a fun little pin I found at the Dollar Store finishes off the card.

Catch the Frenzy!

Monday, March 12, 2012

In like a Lion

My share today is my first as a Design Team member at Fantabulous Cricut for the Challenge Me Monday #102 - In like a Lion.  Please use the link above to check out creations by other DT members for some inspiration.
I found many lion images on several Cricut cartridges.  I decided to use the <Lion>, plus all layers and shadow feature found on page 57 of Create a Critter cartridge cut at 3". 

I also used the <Leaf> on page 51 of the Create a Critter cartridge cut at 2" and used 6 leaves on my card.  The tree is actually the <Branch1> found in the Winter Woodland cartridge, page 38 cut at 2-1/2".  The last cartridge I used was Simply Charmed for the <Sun2> found on page 50 with layer 1 cut at 1-1/2"

This card is a 6" X 6" card.  I used a light blue base, and sponged clouds onto the background with Heavenly blue ink.  I tore 3 strips of garden green paper and used an old Close to My Heart stamp called Scratches and garden green ink onto the torn strips.  I also sponged garden green around all 6 leaves.  The sun and lion have sunflower ink sponged around edges.  The lions mane was ran through my Cuttlebug using the tiny bubble folder.  I then used my Micron black pen to add outline details.  Layer all pieces as shown in the photo working back to front.  All paper, stamps, cloud stencil from Close to My Heart.

For other finishing details... I found some green buttons and added Bon Bon colored twine from Doddlebug design to 5 buttons, made a bow with the twine as well.  And last of all, I stamped my sentiment on white cardstock and mounted to brown cardstock.  I wanted to make it look like a sign hanging from the tree, so I punched tiny holes in the top corners, added same Bon Bon twine.  A brown brad went into the trunk of the tree to hang the sign on.

 I hope you enjoyed my card and thanks for stopping by today. 

Catch the Frenzy!


Sunday, February 12, 2012

3 Valentine shares

Thanks for stopping by today...I have 3 Valentines and one tutorial to share with you


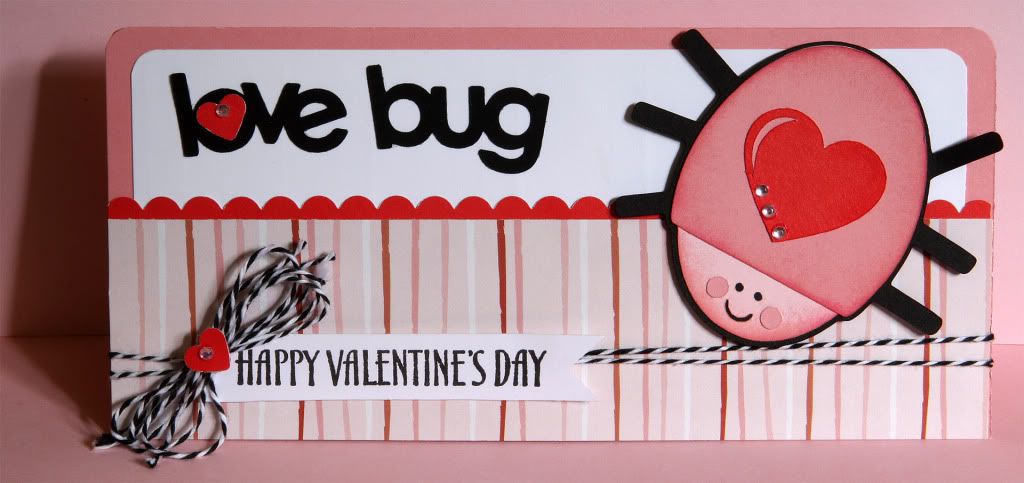
1.)  Love bug

This one makes me smile :) and the colors are one of my favorites together... Black, Red and Pink.  This card will be entered in the Fantabulous Cricut Challenge #97 - Love is in the air (use a heart) check out all the other fabulous ideas at on their blog.
To make this card: 

Start with a pink 7" x 8" cardstock folded in half for the base.  I rounded the top corners of the pink base, as well as the white 2" x 7-1/2" piece.  Next I trimmed a 8" x 1" piece of red cardstock with my scallop scissors.  The piece is striped pattern paper is cut at 2" x 8".  All paper is from my stash of Close to My Heart products.  Layer pieces together as shown in photo, working back to front.


To complete this card:

I used the Simply Charmed cartridge, page 31 <Lovebug1> cut at 3", all layers, shadow and word.  Sponging around the bug in darker pink ink.  I stamped the "Happy Valentine's Day" message (CTMH) on white cardstock and clipped the ends with a square punch to make it into a banner.  I wrapped black bakers twine (Doodlebug Design, Inc) around the bottom of the card, added a bow, small heart punch to both the bow and the "O" then blinged my love bug and hearts with pink rhinestones.

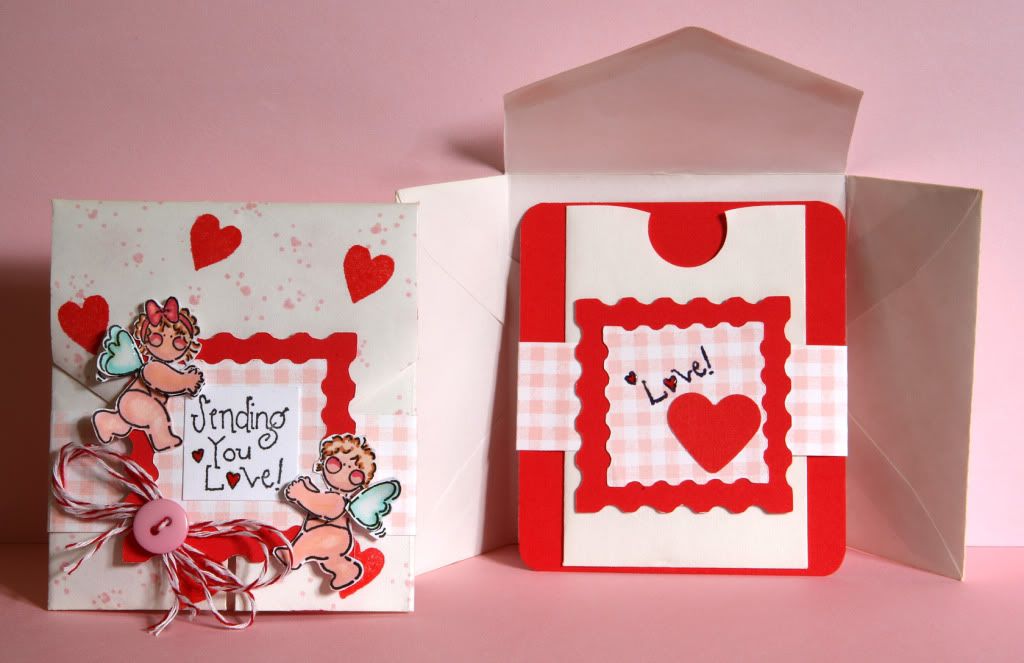
2.)  Sending you love - envelope creation for gift card

This idea is something I have been making for 10+ years when I want to give a gift card to a friend.  I haven't played around with the tutorial video idea yet, so I will explain it with pictures below.  I will be entering this card in My Craft Spot Challenge #43 Valentine's Day (card or treat packaging).

To make this envelope and card: 

Use a standard 3-1/2" x 6-1/2" white envelope, keep the flap open and random stamp the entire envelope, front and back.  I used a really old Close to My Heart background stamp (well love & well used) with a tiny heart cluster pattern with pink ink.  I then went back and filled in using a bold heart stamp from Impress with red ink.

I then cut two sets <Stamp-s> page 37 from the Elegant Edges cartridge, two at 2" red cardstock, the other cut two at 1-1/2" pink gingham pattern paper.  One set for the decorative flap and the other set for the inside card holder.  I also have two 1" x 9" pink gingham pattern paper strips that a wrapped around the envelope to hold side flaps in place, and repeated idea on inside card holder.

To complete this card:

I used black ink to stamp the "Sending you Love!" message (CTMH) on white square and marker to ink on the word "Love!" only for the inside card holder piece.  My two little cherubs (CTMH) were colored and shaded with my Tombow markers (I so want to purchase some Copic markers soon), cut out the cherubs, extra wings and arms for dimension. Layer all pieces as shown in photo.  Only adhere the top portion of the stamped Cricut cut to the flap.  For the inside gift card holder I adhered a small envelope I had in my stash for goodies.  I punched the top with a circle punch so it would be easier to pull out the gift card.  For finishing touches I added a heart punch to the inside gift card holder, red baker twine bow with button and glossy ac
cents to the wings and tint hearts in message.

Read more on How to make the envelope and to see the third share.

Monday, January 2, 2012

Thank you

Happy New Year everyone!  Welcome to "Simply Frenzied", so glad you stopped by, as I am excited to share my first card in today's post.  One of my New Year's resolutions is to try to use supplies and products I already have on hand.  I have been creating cards for over 20 years, and until recently, I was a Close to My Heart consultant.  My inventory of papers, stamps, inks and assortment of accents is extensive.  Again, the plan is to create cards and papercrafts with items I have on hand.  I hope to list supplies, tools and brand names when possible.  However, the evolution of cardmaking and scrapbooking has changed over the past 20 years, so I may be kickin' it old school with some of my creations.  But, know that my goal is to share my passion for papercrafts, and to inspire you in your own unique creativeness. 
For this card cut as follows...

Base of card - cardstock:
Turquoise - 1 x 4-1/4"
White - 4-1/4" x 5-1/2"

Cricut cuts - cardstock:
Elegant Edges - page 59 <Flower2> - 4 inch
Frame feature

Simply Charmed - page 36 <Bird> - 2 inch
Layer 1 - Lt. Turquoise
Layer 2 - Red
Layer 3 - Turquoise
Layer 4 - Yellow
Shadow - Black


Other cuts:
1 inch flower punch - Lt. Turquoise
3/4" circle punch - Pink
1/2" circle punch - Turquoise

To complete the card...

Sponge Turquoise ink around the edges of flower pieces, layer 1 and layer 3 of the bird.

Sponge Red ink around the edges of the pink circle and layer 2 of the bird.
Using your favorite adhesive (I used my Xyron machine), adhere all pieces together, as shown in sample, working back to front.
Stamp "Thank You" (from Close to My Heart - D1361 Thank You set ) inside circle with Turquoise ink.

I added Red adhesive pearls from Recollections to the center of each flower and down the upper, left edge of the Turquoise paper.

All paper and ink from Close to My Heart.

Catch the Frenzy!
Related Posts Plugin for WordPress, Blogger...