Showing posts with label Ultimate Creative Series Sampler. Show all posts

Tuesday, April 1, 2014

Side Step Card

This month at Technique Time Tuesday we are bringing you the Side Step Card
If you haven't had a chance to make this card, I encourage you to play along with us this month
This technique is really fun to do and you can be really creative with your card
You will find a wonderful video tutorial by Mynnette on the blog,
along with the measurements you will need
Here's my card...
  
To make my card I used kraft cardstock, cutting and scoring using the measurements in the tutorial
Solid cream and navy cardstock are scraps from my stash
My designer paper is from a 6 x 6 paper pack by Authentique called PRIDE
Sentiment from Jaded Blossom - Bless the USA inked with Outdoor Denim and Cranberry
Cricut - Ultimate Creative Series Sampler cartridge used for the solider cut at 3-1/2"
I also used George and Basic Shapes cartridge for the stars, cut at 1" and 2"
I gave it a little SPARKLE by adding red adhesive rhinestones
And finished the card with a star and red button tied with navy floss


Make sure to check out the rest of the INSPIRATION by the other Design Team members
Watch the Tutorial, Gather your supplies and get CREATIVE!

I am looking forward to seeing what you come up with for you SIDE STEP CARD

Thanks for coming by today - Catch the Frenzy! - Karen >^..^<


Tuesday, March 18, 2014

A Cameo Appearance - sketch #159

Today is my share for the Design Team at Try Stampin' on Tuesday
 
We have sketch #159 (see sketch below)
TWIST:  A Cameo Appearance
 
 
Using pattern paper from K & Company - Kelly Panacci - Valentine
Black cardstock from my stash
I used Cricut cartridge Ultimate Creative Series Sampler - Bonus 6 - LOVE STRUCK cut at 2.5"
Finished the card with white dollie, pink adhesive rhinestones and Love sentiment
 
Sketch #159
 

Stop by the TSOT blog and check out the other cards made by the rest of Design Team for Team B
I hope you will be able to join us this week and create something wonderful using for this sketch
I look forward to seeing what you create

Thanks for stopping by today - Catch the Frenzy! - Karen 

Monday, May 28, 2012

United We Stand - FCCB #113

Today is Memorial Day, a day where we honor our fallen military men and women who have given their lives for our great country. Over at Fantabulous Cricut for Challenge #113 - Memorial Day we honor those military men and women by making a project using the color Red and has a flag, military symbol or poppy.

My son, Sgt. Kory Howard - 2007
My project share is a mini  6" x 6" scrapbook page of my son, Sgt. Kory Howard on his basic training graduation from Fort Leonardwood, Missouri, October 2007.  He served in the US army for 4 years, 2 tours in Iraq as a Imagery Analysis with Special Forces unit.  I am a proud mother and thankful to have him back home.

For my project I used a 6" x 6" blue base, added a 2" x 6" red pattern paper to the bottom edge.  I trimmed my photo to 3-1/2" x 3-1/2" and mounted onto 4" x 4" white cardstock.

I used my Ultimate Creative Series Sampler for the United We Stand, found on the Bonus 3 overlay, cut at 2".  This image is also found on the Stand and Salute cartridge.


My finishing touches include a yellow ribbon with three poppies from Wild Orchid Crafts, our wonderful sponsor this week.  I also, added two blue punched stars and two circle punches for a journal tag.

Thank you for stopping by today and remember our fallen military men and women.  Support our Troops!

Catch the Frenzy!

Monday, April 23, 2012

FCCB Challenge me Monday...

Monday brings another Challenge Me Monday over at Fantabulous Cricut.  For this weeks challenge #108 On the Go, we are to use either Car, Plane, Train, etc... something that has wheels and moves.

I choose to use an image from my Ultimate Creative Series Sampler cartridge, Bicycle <image23> on the Bonus 2 overlay (note:  this image is also found in the Heritage cartridge), cut at 3".  Making this card took some time, as I decided to do a little paper piecing.  I actually cut the image out 4 times to get the varies pieces in the four colors I wanted to use.  Light Grey, Grey, Red and Yellow.  After cutting out my pieces, I added sponging and line work around the edges.  I then layered my pieces together, working back to front.

I found a great piece of background paper from a 6" x 6" pad by Miss Caroline called Dilly Dally.  It made it look like the bicycle was leaning against a wall.  I then used the Elegant Edges cartridge to cut a 4" <Flwer3-s>, pg. 65 using the oblong feature.  I stamped my sentiment in the center.

My finishing touches as the yellow flowers with buttons and brads added to the center.  I added brads under the sentiment and tied red bakers twine around the top of my card.  To create the flowers in the basket, I first added a small piece of paper doily draped over the top.  I then punched 9 circles using a paper punch, doodled lines around them and added them to the basket.  I filled in some gaps with 3 more brads and finished with glossy accents.

Thank you for staopping by today and please take a minute to check out the challenge at Fantabulous Cricut and consider playing along this week.  We would love to see what you have created.

Catch the Frenzy!

Monday, April 16, 2012

April Showers

It's another Fantabulous Cricut Challenge Me Monday #107.  For this challenge you will need to use an umbrella, rain or clouds.  I ended up using all three for my card. 

I started with a white A2 card, lightly sponged clouds on the background using Crystal Blue ink and cloud stencil by Close to My Heart.  Next I added a strip of Crystal Blue gingham pattern paper cut at 1/2" x 4-1/4" to bottom edge and a piece of Crystal Blue cardstock cut at 1/2" .  See photo for placement.

I cut <Image41-s> from my Ultimate Creative Series Sampler cartridge at 4" using the Bonus 6 overlay.  This image is also found in A Child's Year cartridge.

My sentiments were computer generated, cut and mounted onto Carnation Pink cardstock.

My finishing touches were adding floss bow, Flowers with gingham paper centers and brad added to the center of the flowers and at the bottom on the circle.  I also found some adhesive raindrops to add to the background.

Thank you for stopping by today an I hope you have a chance to play along with us at Fantabulous Cricut this week.

Catch the Frenzy!

Friday, March 30, 2012

Colorful Creations - Spring Fling Blog Hop


Thanks for playing along in our "Spring Fling Blog Hop"!

My challenge for you is to create an Easter card using a cross.
After you complete your project, post it in the Colorful Creations gallery
Please tag it "DT Karen Spring Fling".
Also, please link your project to my blog using the link at the bottom of this post.
Your layout or project must be newly created as of March 30th
 and cannot be combined with any other CC Challenges.
You have until Saturday, April 8th midnight MST to complete your challenges


Make sure to use at least 7 of the secret products on your layout/project,
then post a link in the Spring Fling Challenge Event!
 Leave a comment, after you post your layout/project,
 so we can leave you some love on your blog,
doing so you will be entered into RAK's offered for the DT blog challenges!

For your "Spring Fling Challenge" my product is to raid your stash
and use buttons on your layout or project!

I can’t wait to see your creations! Here is my example...

It's time to do a bit of Spring Cleaning of your stash!

Each DT member will give you a product from your stash,
to be combined into your layout/project for the

Andrew came from here
Karen You are here
Kristie go here next

Here's how to win the RAK to the right
  • Become a follower of my blog
  • Participate in my above card challenge
  • Leave a comment here and on the Colorful Creation blog
  • Answer 6 trivia questions about my blog - send answers to my email at stampinQT@comcast.net
  • DO NOT post answers in the comment section
All answers can be found on my blog.  Have fun!
1.)  What city and state do I live in?
2.)  What is the phrase I use at the end of each post?
3.)  What date did I post "The Bold & The Beautiful"?
4.)  Besides Colorful Creations, name one other DT that I am on.
5.)  What is my occupation?
6.)  What is the meaning of Frenzied?
All persons with all 6 (six) answers correct will go into a random drawing for the RAK.

Catch the Frenzy!


Wednesday, March 7, 2012

I'm not lion...

Today my sharing is a card I made for My Craft Spot challenge #46 - Make us laugh.  I do not have much in the way of stamps with funny sayings or puns, but thank goodness for the computer and the ability to use it for searching. I did find a great website for Top 100 animal puns.  Korney, silly puns to use on cards, which I did for my submission.  I hope you'll enjoy it and think that it's punny! or at least make you GIGGLE!


To make this card:
I started with an ivory A2 cardstock card.  I then added patterned paper to the background.  Polka dotted paper is cut 3" x 4-1/4" and the diamond pattern paper is cut 2-1/2" x 4-1/4". All paper from Close to My Heart.

Cartridges:
Ultimate Creative Series Sampler, which has so much to offer.  I used Bonus 4 for the lion, which is Image13 with layers cut at 3-1/2".  You can also find this lion in the Animal Kingdom cartridge.  The grass is on the Bonus 5, Image42 cut at 1-1/2".  This image can be found in the Plantin' SchoolBook cartridge.  And the last image I used was the hat and layers, Bonus 2, Image15 & Image16 cut at 1-1/2", which is from the Forever Young cartridge.

To complete this card:
I chalked around the edges of my images, as well as used a black micron pen to outline the images.  Layer all pieces as seen in the photo, working back to front.  I gave the  Lion some Glossy Accents on the eyes and nose, which I colored in with the black pen first.  I added an adhesive pearl to the center of the flowers, one found inside.  I created the message on the computer, punched it out with my 1-1/2" circle punch and layered it on top of a red 1-3/4" circle.  A GIGGLE ticket from Tim Holtz is tucked under the circle. 

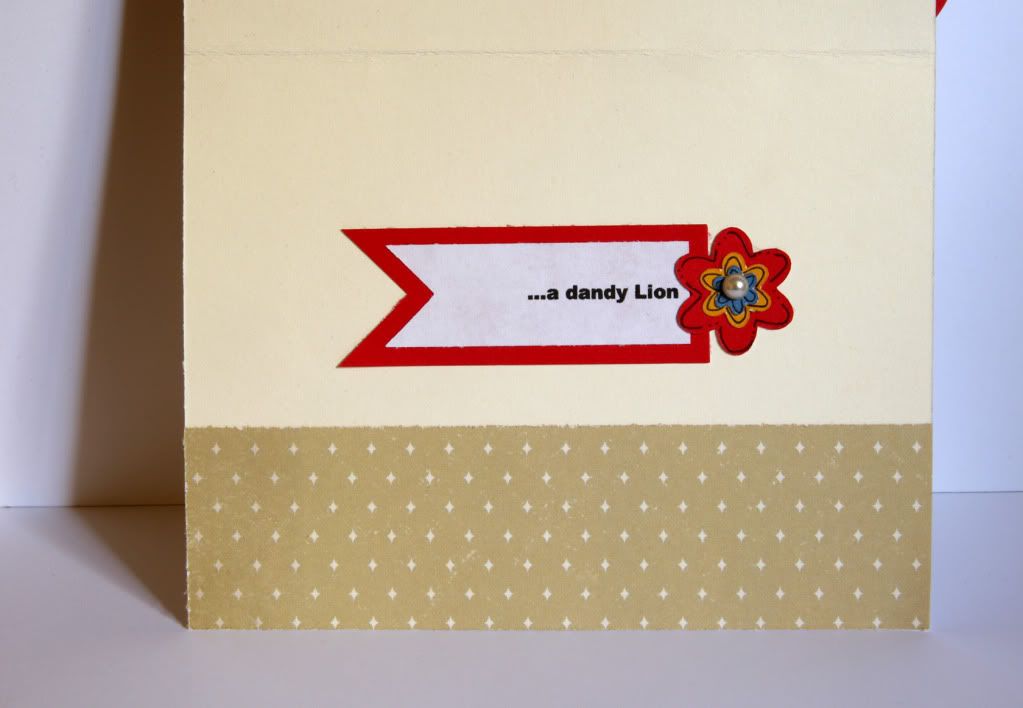
Inside of card
So the question is, "What do you call a Lion wearing a stylish hat?"

The answer, "...a dandy Lion" 

Enjoy you evening and thanks for stopping by.


Catch the Frenzy!

Sunday, February 12, 2012

3 Valentine shares

Thanks for stopping by today...I have 3 Valentines and one tutorial to share with you


1.)  Love bug

This one makes me smile :) and the colors are one of my favorites together... Black, Red and Pink.  This card will be entered in the Fantabulous Cricut Challenge #97 - Love is in the air (use a heart) check out all the other fabulous ideas at on their blog.
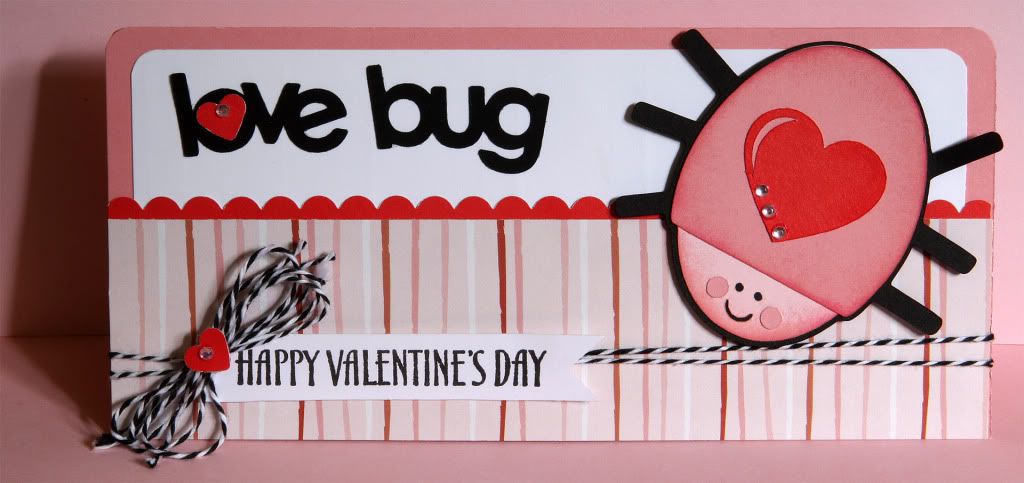
To make this card: 

Start with a pink 7" x 8" cardstock folded in half for the base.  I rounded the top corners of the pink base, as well as the white 2" x 7-1/2" piece.  Next I trimmed a 8" x 1" piece of red cardstock with my scallop scissors.  The piece is striped pattern paper is cut at 2" x 8".  All paper is from my stash of Close to My Heart products.  Layer pieces together as shown in photo, working back to front.


To complete this card:

I used the Simply Charmed cartridge, page 31 <Lovebug1> cut at 3", all layers, shadow and word.  Sponging around the bug in darker pink ink.  I stamped the "Happy Valentine's Day" message (CTMH) on white cardstock and clipped the ends with a square punch to make it into a banner.  I wrapped black bakers twine (Doodlebug Design, Inc) around the bottom of the card, added a bow, small heart punch to both the bow and the "O" then blinged my love bug and hearts with pink rhinestones.

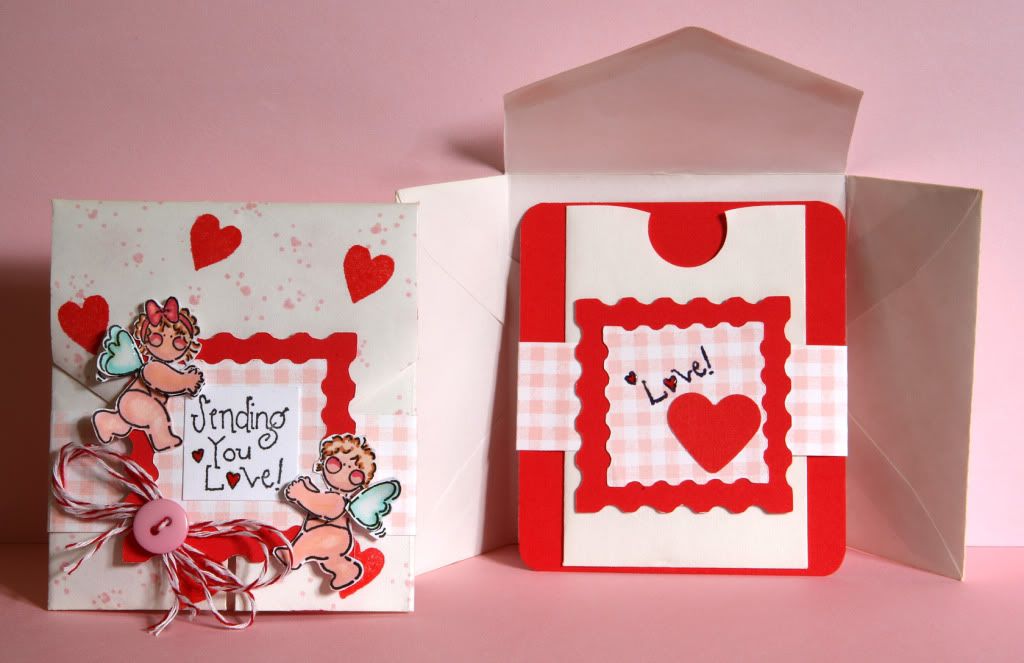
2.)  Sending you love - envelope creation for gift card

This idea is something I have been making for 10+ years when I want to give a gift card to a friend.  I haven't played around with the tutorial video idea yet, so I will explain it with pictures below.  I will be entering this card in My Craft Spot Challenge #43 Valentine's Day (card or treat packaging).

To make this envelope and card: 

Use a standard 3-1/2" x 6-1/2" white envelope, keep the flap open and random stamp the entire envelope, front and back.  I used a really old Close to My Heart background stamp (well love & well used) with a tiny heart cluster pattern with pink ink.  I then went back and filled in using a bold heart stamp from Impress with red ink.

I then cut two sets <Stamp-s> page 37 from the Elegant Edges cartridge, two at 2" red cardstock, the other cut two at 1-1/2" pink gingham pattern paper.  One set for the decorative flap and the other set for the inside card holder.  I also have two 1" x 9" pink gingham pattern paper strips that a wrapped around the envelope to hold side flaps in place, and repeated idea on inside card holder.

To complete this card:

I used black ink to stamp the "Sending you Love!" message (CTMH) on white square and marker to ink on the word "Love!" only for the inside card holder piece.  My two little cherubs (CTMH) were colored and shaded with my Tombow markers (I so want to purchase some Copic markers soon), cut out the cherubs, extra wings and arms for dimension. Layer all pieces as shown in photo.  Only adhere the top portion of the stamped Cricut cut to the flap.  For the inside gift card holder I adhered a small envelope I had in my stash for goodies.  I punched the top with a circle punch so it would be easier to pull out the gift card.  For finishing touches I added a heart punch to the inside gift card holder, red baker twine bow with button and glossy ac
cents to the wings and tint hearts in message.

Read more on How to make the envelope and to see the third share.
Related Posts Plugin for WordPress, Blogger...